

Upgrading your Shopify theme can be a complex process, especially when there have been code customizations over a long period of time . However, upgrading is a valuable task, offering enhanced features, improved performance, and better security for your online store. With a systematic approach, you can ensure a smooth transition. This post will guide you through the best practices for upgrading a customized Shopify theme, using tools like GitHub and Visual Studio Code (VSCode) for version control and comparison, as well as Shopify’s own resources.
Step 1: Backup Your Current Theme
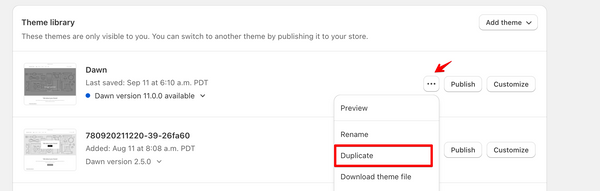
Before you begin the upgrade process, it's crucial to create a backup (duplicate) of your current theme. This backup serves as a safety net, allowing you to revert to the previous version if any issues arise during the upgrade. Additionally, having a backup can be useful for quick comparisons between the old and new versions of your theme.
Step 2: Identify and Document Customizations
Next, you should identify the customizations made to your current theme, from the original version. Unfortunately, Shopify does not allow you to download specific past versions of a theme from the Shopify Theme Store. Therefore, it's crucial to regularly backup your theme versions in your Shopify admin or keep a copy of the theme file saved elsewhere.
To compare your current theme’s code with an unmodified version of the same theme, you can use tools like GitHub or VSCode. In GitHub, you can use the Compare tool to see the differences between two commits. In VSCode, the Compare Files feature can be used to compare two files side by side.
Once you’ve identified the customizations, document them. This includes noting down the files that were modified and the purpose of these changes. This will help you understand what code needs to be ported to the new theme and importantly - what doesn’t.

Step 3: Download the Latest Theme Version
Now, download the latest version of your theme from the Shopify Theme Store. This will serve as the base for your upgraded theme.

Step 4: Implement Customizations on the New Theme
Migrate the customizations you documented in step 2 in the new theme. It’s recommended to do this systematically, file by file, to ensure nothing is missed.
Here’s a detailed process on how to move customizations:
- Settings: Copy the settings_data.json file from the config directory of your old theme to the new one. This file contains all the settings of your theme, including colors, fonts, layout settings, etc.
- Templates: If you have customized templates, copy the corresponding .liquid files from the templates directory of your old theme to the new one.
- Sections and Snippets: If you have customized sections or snippets, copy the corresponding .liquid files from the sections and snippets directories of your old theme to the new one.
- Assets: If you have added or modified assets (images, CSS files, JavaScript files, etc.), copy them from the assets directory of your old theme to the new one.
- Locales: If you have added or modified translations, copy the corresponding .json files from the locales directory of your old theme to the new one.
Remember to use GitHub or VSCode to compare the files before and after the changes to ensure all customizations have been correctly implemented.
Troubleshooting issues you may find when migrating code changes.

When moving settings from your old theme to the new one, you may encounter a few issues. Here are some common problems and their solutions:
Problem: If your old theme has custom blocks that are not present in the new theme, copying the settings_data.json file directly will result in an error. This is because the new theme doesn’t recognize these custom blocks.
Solution: Before copying the settings_data.json file, you need to manually remove the settings related to the custom blocks from the file. You can do this by opening the file in a text editor, finding the settings related to the custom blocks, and deleting them.
After copying the file to the new theme, you’ll need to recreate these custom blocks in the new theme and configure their settings manually.
Problem:Sometimes, a theme update may deprecate certain settings. If your old theme uses these deprecated settings, copying the settings_data.json file directly will result in an error.
Solution: You’ll need to manually remove the deprecated settings from the settings_data.json file before copying it to the new theme.
After copying the file, you’ll need to find the new equivalent settings in the new theme and configure them manually.
Problem: If your settings_data.json file references files (like images or fonts) that are not present in the new theme, this will result in an error.
Solution:Before copying the settings_data.json file, make sure to also copy all the referenced files from the assets directory of your old theme to the new one.
Note:
When resolving these issues, it’s important to have a good understanding of the structure and content of the settings_data.json file. This file is written in JSON format, which is a common data format with a diverse range of applications. If you’re not familiar with JSON, there are many resources available online that can help you understand it.
Remember to always make a backup of your settings_data.json file before making any changes. This way, if something goes wrong, you can always revert back to the original file.
Step 5: Review and Optimize Apps
Before proceeding with the implementation of customizations, it’s important to review the apps currently in use. Often, a theme upgrade introduces the same features that an app is currently providing and therefore you no longer require.
Confirm with your team which apps are required and which are not. Determine if the new theme upgrade provides any of these features. This step not only helps in optimizing the apps but also reduces the complexity of the theme, making it easier to manage and faster to load.
Once you’ve identified the apps that are still required, you’ll need to move their customizations to the new theme. Here’s how to do it:
- Review App Documentation: Most apps provide detailed documentation on how to install and customize them. Review this documentation to understand how to implement the app in the new theme.
- Reach Out to App Support: If the documentation is not clear or if you encounter any issues, reach out to the app’s support team. They can provide guidance and help resolve any problems.
- Test the App: After implementing the app in the new theme, test it thoroughly to ensure it’s working as expected. Check all the pages and functionalities that use the app.
Remember, each app is different, so the process of moving its customizations may vary. Always make sure to test the app thoroughly after implementing it in the new theme.
Step 6: Use GitHub for Version Control
Using a version control program like GitHub is crucial during this process. It allows you to track changes, create branches, and have a clear record of all the changes performed. This can be particularly useful if multiple developers are working on the project and making changes.

Step 7: Test the Upgraded Theme
Once all customizations have been implemented, it’s time to test the upgraded theme. This includes checking all pages, functionalities, and apps to ensure they’re working as expected. Test the complete checkout experience from landing on the homepage, viewing and adding products, all the way to checking out. Shopify offers a theme preview feature that allows you to test your theme without affecting your live store.
Step 8: Go Live
After thoroughly testing, if everything is working as expected, you can publish your new theme. Remember, it’s always a good idea to do this during off-peak hours to minimize potential disruptions to your customers.
Conclusion
Upgrading your Shopify theme should be the first step towards improving your online store. While it can be a complex process, especially with customized themes, the benefits are substantial. An upgrade not only introduces new features and improved performance, but also enhances security measures. By following these steps, you can ensure a smooth upgrade process. Remember, always backup your current theme before starting, document your customizations, use GitHub or VSCode for version control and comparison, and thoroughly test your new theme before going live. This systematic approach will help you leverage the benefits of an upgraded theme while minimizing potential disruptions.
For more detailed information, you can always refer to the Shopify Help Center or the Shopify Developer Documentation. These resources provide a wealth of information and can be invaluable during your theme upgrade process.
Additionally, you can reach out to our Growth Team at Professional Services for a quote for us to help with or do this work for you. Happy upgrading!